Beginners guide to Athena – Part 1: Getting Started
What is this article about?
In this article, we will start exploring AWS Athena,
You will learn how to create a query.
This article is mainly for BI developers who want to extend their capabilities to handle Big Data.
What is Athena?
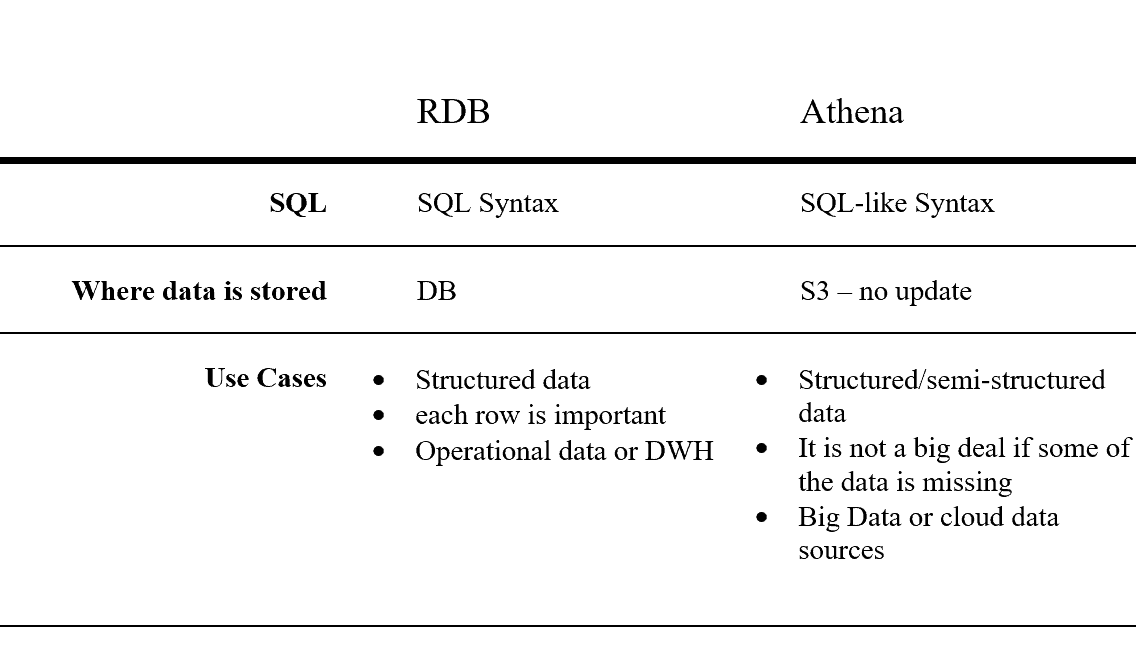
Athena is a full, serverless service that gives you the power to make SQL-like queries on top of structured and semi-structured files in S3.
It is important to note that Data is not stored in Athena. Athena only query the data nut doesn’t store it.
If you would like to query files in s3, you should first create a table.
The difference between a Relational DB and Athena

Getting Started
First you need an AWS account for using its services.
** If you already have an Account skip to the next section.
- Open your browser
- Enter https://aws.amazon.com/
- Click on “Create an AWS Account”
- Enter your email and password
- Click “Continue”
- Enter your Contact Information
- Check the box “Check here to indicate that you…”
- Click “Create Account and Continue”
- Enter your “Payment Information”
- Click “Verify and Add”
- Finish the “Confirm your identity” process
- Select the Free Basic Plan
- That is, you have an AWS Account
- Sign into the Consol.
Second, you need to upload you file to S3
- Go to S3 and click “Create Bucket”
- Enter you Bucket Name and choose the region
- Click the Next
- Click “Create Bucket”
Now you should see your Bucket
- Click your Bucket
- Click “Create Folder”
- Name you Folder “Financial_Example” and click “Save”
- Upload the Financial_Example File to your new Folder
- You can find the file here.
Creating a Table
- Click on “Connect data source”

- Check the “Query data in Amazon S3”, “AWS Glue data catalog”
- Click Next

And then you need to choose:

- Using AWS Glue on S3
* Glue is an AWS service that creates automatic schemas based on files.* It’s a great way to automate things if you have been granted the right permissions. - Create a table manually (generate a SQL-like script).
- Using AWS Glue on S3
- Choose the manual option and click “Next”, which will bring you to this screen:

- Choose your database (or create a new one)
- Choose a table name and the folder your table will be connected to (the Folder we created earlier) and click “Next”.
* note the external bullet, which is selected, and can’t be changed.The reason for this is that we can’t insert data into Athena. Athena doesn’t save any data, only meta data. There is no insert clause in Athena. (There is, however, an insert into s3.) - Choose CSV/JSON and click “Next”:

- Name your Columns and their Types (You can also add multiple columns as bulk.) and click “Next”

- The last step is configuring partitions

* It’s important to note that if you have a column that functions as the partition key, you should not include it in the columns, but instead only in the partition section. - Click “Create table”, and you your SQL Query is completed. 😊
Now, you should be able to see your table on the left panel and you can query it.
Another way to accomplish this is from the screen seen here below:

Important notes
* It’s important to know that Athena isn’t actually creating tables.
What it’s doing is creating schemas from tables, which enables us to design queries using the tables, despite the fact that the data is located in unrelated files.
* pay attention not to put files in your source folder, if they do not correspond to the schema you just defined.
Treat this folder as a place you insert only files that contain rows or objects with the same schema.
Next Post, we will dive into Athena with examples of query over CSV and JSON. Stay tuned!


